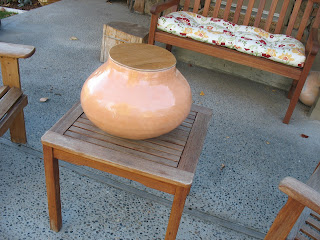
MUD TO MUSIC, Ceramic drums
An exercise in discovery
During the process of building large, earthenware water jars, I kept hearing the comment that I should turn one into a drum. Good Idea!, AND, I wanted a drum anyway to annoy my family and pet. My first ceramic drum was an exercise in attaching drum heads and hardware to a large jar, AND realizing that it would require $100 of drum hardware to make an $80 drum. Not real profitable when compared to the 5 or 10 cents I make on cups.
You have to know that I’ve designed and made several Tarwackys which are guitar similar stringed musical devices for producing funky sound. There, the sound board top is glued wood-on-wood. Guitarists rely on the instrument staying together under normal use, so why not glue the drum head onto a bisque ware body?. Both wood and the bisque pot lip are porous and the two surfaces should accept Elmer’s type glues, better yet with permanent, non-water soluble glues such as “Tight bond”.
Thinking about a guitar top, I made sure a porous earthenware water jar lip was very flat by sanding the bone dry greenware. I found that it works better to sand with a large sheet on top of the jar, instead of laying the sanding surface on a table and sanding under the weight of the jar. Another difference in jars and drums is that drums need a hole for the air (sound) to exit the drum body, meaning I have to have a hole as well as a drum head.
The glued plywood head is the most novel aspect of these drums. It is considerably cheaper for the drum maker to affix the head of thin plywood with glue than utilize drum head skins with complicated head stretching hardware. I do reinforce the first gluing by filling in holes (between head and body) and tightening the wood to clay bond. I have found that the drum head, if installed with some care, is almost impossible to pop off and have yet to have one dislodge from the drum body.
The drum head tones and any additional Ohulu style “boingy” or bouncy sounds are a response of the drums sound hole and chamber. Brush, snare, and rattles are a secondary function of what is attached to the inside of the head for additional tonal interest and complexity. Additionally, any drum needs an opening for the sound to exhale from the drum body, as mentioned above. The constraints can be dovetailed by making the uhlu sound hole in various ways to enhance the bounce (or boing). Drum features which apparently have an effect on the bounce are sound hole size, placement, and neck height. The possible configurations are limitless but, it is easy to extrapolate the desired features after building a few drums. The designer/constructor will generally sense the directions he/she wants to pursue after playing a few completed drums.
Posted below are several drums and a discussion of their strengths and weakness. A weakness that all ceramic drums share is excessive weight. In ALL cases, the drum is heavier than a wood, gourd, or similar drum body materials. As a counterpoint to drum criteria, ceramic lends itself to an organic shape and design and this enhances the sound, as does the bisque ware fired porcelain of earthenware clay process. Clay is very plastic in the construction (wet clay) stages and lends itself to the organic forms which produce pleasing instrumental sounds.


I just reviewed my "mud to music" and realized I inadvertently wrote the wrong "David" into my thanks. I meant to say, "David Blink". Thanks again David.
ReplyDeleteMike, you can click the little pencil button at the bottom of your blog (when you are signed in) and that should allow you to edit your post.
ReplyDeleteDoesn't that red drum look nice? Can't you hear all the other drums asking for surface treatments other than bisque-pink?
Are there more drums/instruments on their way because of the book "Mud to Music"? I started reading it this summer and all I kept want to do was try things from it. (I have a link to the book at the bottom of this post: http://racheldorn.blogspot.com/2011/09/independent-clay-blog-project.html)
It's really nice and meanful. it's really cool blog. Linking is very useful thing.you have really helped lots of people who visit blog and provide them usefull information. VDJ Courses
ReplyDeleteI was very pleased to find this site.I wanted to thank you for this great read!! I definitely enjoying every little bit of it and I have you bookmarked to check out new stuff you post. VDJ Courses
ReplyDeleteVery nice indeed! How did you fire those huge things?
ReplyDelete