Tuesday, March 6, 2012

Rebuilding a $4.99 guitar


Reciently, wandering through a Goodwill store, I spotted a very direlect guitar, if it could be called that.  It was more like a toy guitar with broken strings, dirty, and generally not worth the $4.99 asking price.  However, on closer look the neck appeared to be straight, bolt on, frets flat, and other parts also had potential on one of my ceramic guitars.  AND the strap is a nice strong one, worth about $4.98 at any music store.


Because I didn't see any potential in this piece of junk I didn't take any pictures of it.  However, once the parts started coming off I realized this was the perfect "Strat type" guitar for the hollow body experiment I'd always wanted to perform on a strat, ie, strip it off, cut it open, hollow it out and put it back together.  The photo above is at the state where I was simply figuring out how to hollow out a strat.  You can see my "cut here" lines, and some stylistic "f holes" drawn on with a silver sharpie.  Also, at this stage, having a rattle-can of silver paint in hand, I hit the headstock to remove the (now forgotten) brand,,, probably a mistake, but let's move on here. 

Here are some parts, once they were removed and cleaned up.  That's a signed inspection sticker on the (4 hole) neck plate


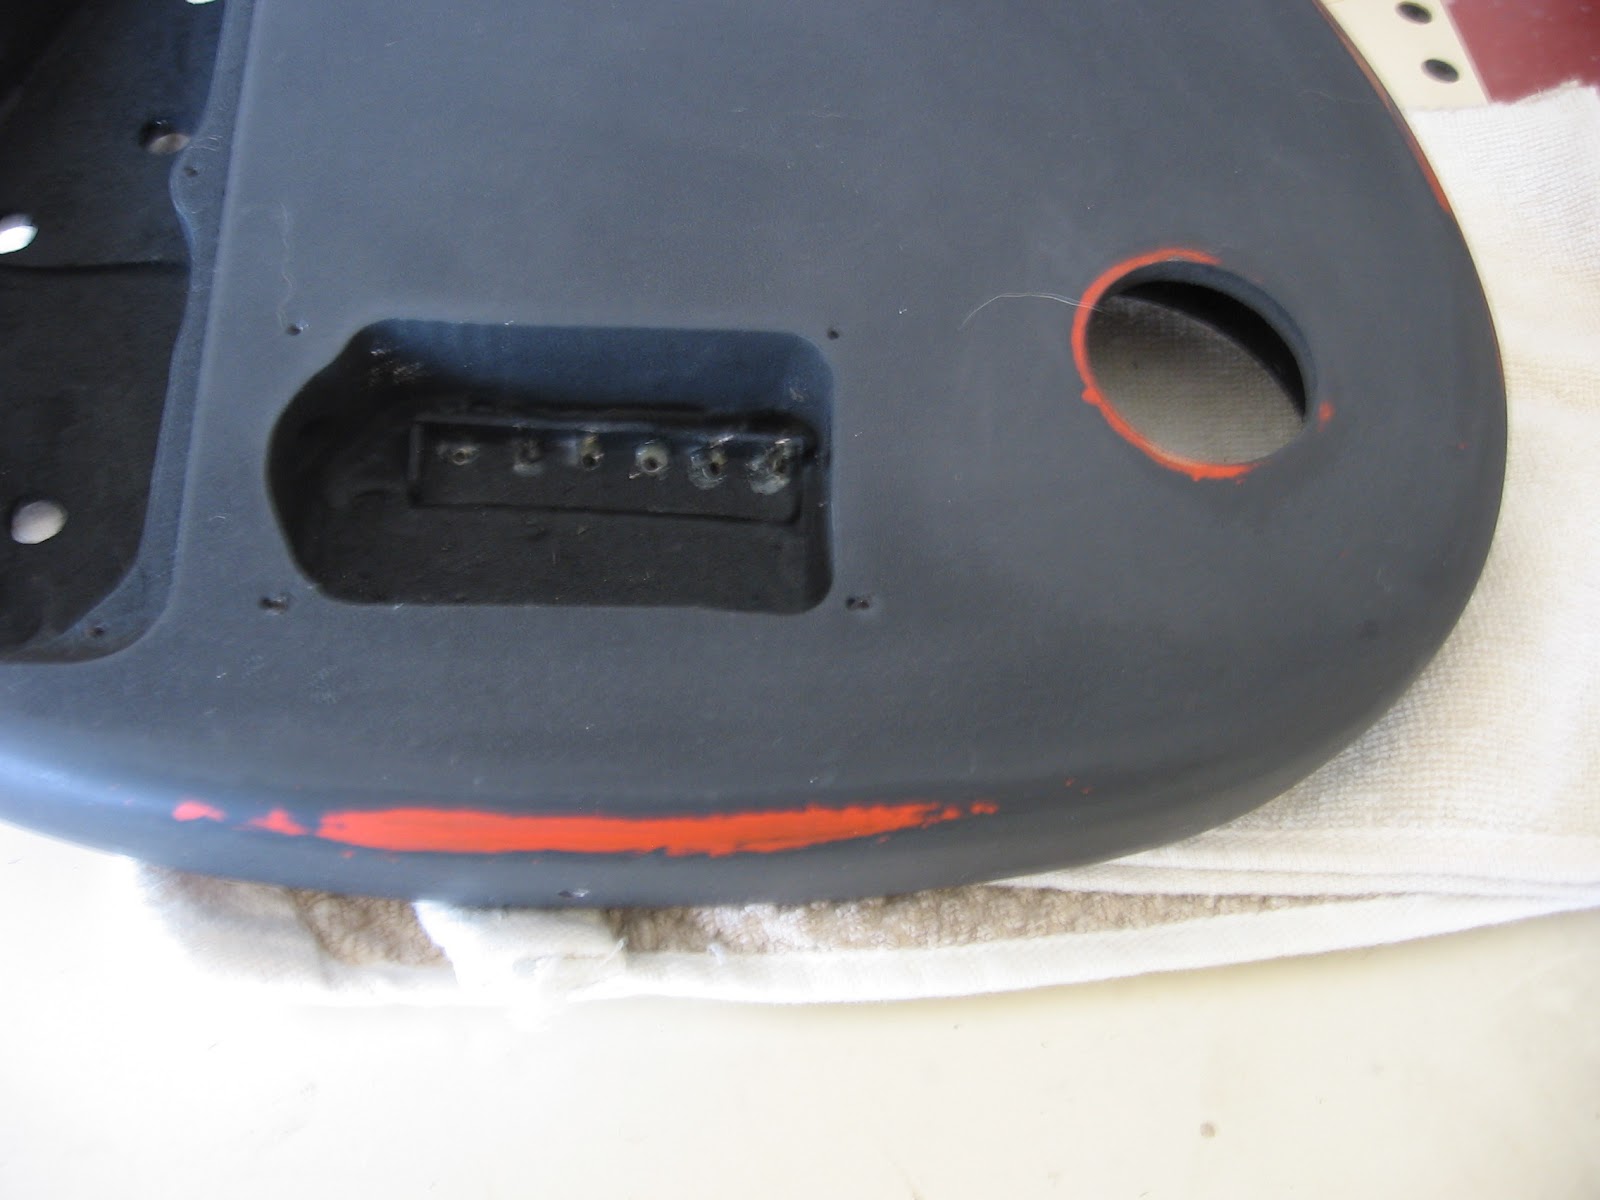
and this is a close up of the body without the guts.  That round hole to the left lower is the "SPEAKER hole" (that's right, it had it's own amp).  Not sure what the funny white powder is that was all over the inside?? Anyway, minus the two single coil pick-ups, wiring and switches (note that one of the jack holes  has failed): 


and the back.  That yellow hole is the battery compartment after I'd beefed it up with a veneer sheet.  The big trap door to the left was the guts.  The little round hole on the right was a sound hole for the back of the speaker. You can see that I intended to modify the shape of this strat to an Ibanez TM "abreviated" 


Once everything was stripped out and I'd drawn a pick guard on the face i realized that cutting on this beast was not necessary, It's already hollow.  Counting the bat hole, the speaker hole, the electronics hole, and the two pick-up holes, it's about as hollow as a solid guitar can get.  You can see that I traced out the bat hole on the front of the face to get an idea of it's "hollowness".  At this stage I'm still thinking about cutting it somehow.  Anyone have a skill saw? 


Did I mention that this guitar turned out to have a "truss rod" in the neck and a scale of 24 inches (part of the toy guitar thing I guess).  The frets are solid and flat, the keys are generally working (minus one plastic bushing), and it seemed to me it needed a "roller" T on the headstock. 

Here you can see a mock up pick guard (maple ply), the shined up bridge, and the front of the speaker hole.  


The guts plate, the one piece keys, and some other parts laying about, looking to get lost on the floor.  Oh, those two strap locks on the left are destined for something soon.  Also, I found some nice new shiny matching strap buttons at Steward McDonalds and a set of "antique" bushings for the keys. 


I happened to have some thin hobby store plywood that I  had used when I was making wooden strat pick guards and it mocked up fine.  You can see I've fixed the jack hole, no need for two jacks anyway?  


Well, time to paint it.  However, I've alway liked those fake vintage fender models and have actually tried some of the techniques for "fake ceramic cups" which mock the old "well used" look.  In this case, for contrast with black, I first painted the guitar (or the edges at least) orange to have color come out in a "wear pattern" once it's black.... read on. 


Then, an application of black satin, some rubbing on the edges, and a 'screw on" of the neck, and "Whollia" (or however you spell it"? 


and a close up.  I painted this side a bit rough so the guitar will cling to the player.  Notice the antique look of the speaker breather hole, If they had speaker holes 50 years ago.  Here you can see that I've prepared the battery hole to install some "Through the body" string bushings.  More on that in a later shot. 


and  a "far out" of the front.  It's resting on my clay slab roller.  As I have a foam cover on the rollers, this makes a perfect guitar stand.  See pick guiard and speaker plugs on the left and the string "throught holes" shining up a bit at the bottom.   This replaces the old, cheap, whammy bridge and spring. 


and now with bridge, plugs, and unpickuped guard.  


new shims and newly greased keys.  See the new roller-T for high E/B


Here are the string holes and the polished bridge base


and now the pick up hole is cut and one of the original pickups is in place.  I plan a single/single coil PU and I'd like to switch between two capicators, but who knows? Oh yea, I installed some old, used strings that were once on an accoustic


Looking Good!.  Don't you just love that smooth paint job (below) and the misplaced pick guard hole?  Oh well, it's got more problems than that. 


and a bigger shot. looking up, pick at the ready. 


and, at about $15.00 you have an instant fake vintage, fake adult, fake beautiful guitar.  Once the rebolted neck settled down it holds tune about as well as can be expected from the keys, the neck is almost mystically "on" (in the lower frest),  and as it's so light and short, it's a wonder to play with my short arms (compared to Robert Johnson). Yea, it's a bit hollow, but perhaps a hot single coil will bring out the empty spaces.  


Oh yea, don't click on the arrow in the picture above thinking it's the link to a Utube video, it's a fender guitar pick.   HOWEVER, no guts, literally, there is no wiring in the guitar right now as I'll have to completely rewire it.  It now needs new keys, a wring kit, and a jack plug.  Think I'll try one of the pickups that it came with.  So instead of having a great $4.99 guitar I'll have a "so-so" $95.00 used guitar of uncertain abilities.  Oh well, it's the journey isn't it.  So stay tuned to the "Wiring edition" of the "5 buck chuck" 

Well, the experiment was a lot of fun.  Now where the heck did I put that credit card?  


Friday, March 2, 2012

Reflection on a Waning Moon, Part II


Three Hundred poems
     in a thousand years.

The gentle winds
     Remain the same

As if no time expires
     Through their sequence

As if no memory 
     Alters their course


Thursday, March 1, 2012

The process of Poly Chrome

I reciently posted an extensive piece in "clayforms" that I want to try and read into this blog.  I deals superficially with the technique and process required by SW natives to create master artistry almost 800 years ago.  Knows as "Casas Grandes" or "Mata Ortez" Polychromes, these jars were incredable designs separate from the pots, but when fired onto the pot surfaces, they are technological marvels.  Let's dive in to this subject and see what we can find out?


THURSDAY, MARCH 1, 2012

The Clay form as a canvas for images

This post deals with the question about describing a technique or process I have worked with this quarter.  I want to talk about the Mata Ortiz/Casas Grandes pottery and the unique way the ancient SW natives (and their North central Mexican relatives).  Here is an example:


This is an earthenware pot around 10" X 10" which is covered with a white slip and the design is painted over the top.  I'm guessing it is low fired with natural slips and stains.  This pot is typical of the surface designs in this area around 1000 AD.  Now let's look at what developed from this form a few hundred years later: 


what was one color over the white slip surface has become a true "Polychrome" with black and red slips over the surface in very interesting designs.  Looks easy enough, but it proves to be more of a practical problem in application. 

I reviewed the Mata Ortiz shards of a local artist and discovered that they are is truly very thin, and the white slip covering is relatively uniform. The lips of the pots were a bit thicker, indicating that they actually used these paintings some for (possible) practical uses.  They could also have been used for burials or other ceremonials?  Basically, todays archaeologists have no real idea what the utilitarian nature of this stuff is? 


In trying first to create suitable jars for slip covering/design application, I discovered that slips are much harder to apply when the slip surface is burnished.  For this reason I have tried sanding it to achieve a smooth surface.  It seems it is best to bisque the pot and then sand it with water to avoid dust.  Of course, the natives, working outside, would not have been particularly concerned with dust. Also, doubtful if they had high quality sand paper? 


After making a few of these jars (between 10" and 12" diameter) it is my guess that there was some specialization going on.  It seems that creating these stone canvasas in 1100 AD would have requaired pot builders specializing in the high quality displayed here AND specialized surface decorators.  I suppose in a primitive studio an artist could construct and fire a couple of jars.  I once visited Choco Canyon, NM and judging by the sheer volume of shards, that the natives either broke a lot of pots, or were unconcerned with having to replace these pots frequently.  Some areas are literally paved with shards. 


Back to process.  First of all, lead pencil marks completely disappear when fired to cone 06.  Also a wood fired kiln would have required a very tight fitting sager for firing this clean.  The application of a consistent red slip would also have required much cultural continuity in the pottery trade. I have no idea what the design painters were thinking when they did these surface embellishments.  They seem almost humorous and current, more like something from cubism.  

Also, the artistic talent required to get this detail with hand made slips and hand made brushes is truly amazing.  The consistency of line and form on these surfaces is incredably difficult to achieve, particularly on a three deminsional surface.  I don't see any crowding or compromise with the form so planning must have been parimount.  

Here we are back at a black slip on white body, with a bit of red color on the pot lip.  The reds, from pot to pot, vary from almost yellow to almost orange, and always a bit redder than is possible with just red iron oxide.  I am guessing specialists mined and processed these slips for the artists. 


Bowls were more common at the earlier phases of this ceramic era. With bowls the primary designs were inside the bowl.  I'm guessing this was one step in the evolution of the "surface for design" tradition.  Cooking in these utinsels would have resulted in smoke blacking, which is uncommon with the pieces I have seen photographed. 


Another bowl interior

and a fanciful figure jar.  Aside from the primitive characterization, these figurines are surprisingly lifelike and expressive, suggesting individual representations.


Naturally, like myself, other modern potters have been impressed with the ancient tradition of SW polychrome and tried to replicate it on pottery. I show these successful, modern approaches, both to illustrate their success and to illustrate their lack of success.  They have replicated the technical intensity of the pieces, but are too perfect to capture the aliveness of the originals.  The edges are too perfect, the use of stencils is evident, and the colors are too uniform.  


check out the next piece for the contrast of new and old: 


and finally, here is a modern photo illustrating the setting in which the original pieces were made.  This is a thunderstorm taking place over a site near Casas Grandes.  


Are there other technique and process answers to gleen from the old pottery.  I'm guessing it will be very hard to  replicate their process and remain true to the present.  The modern potter has electric kilns and can thus avoid reduction firing.  They have a modern tradition of ceramic color supply houses to solve the problems of mineral stains.  And, practically anything can be painted on the 3D surface as long as the artist considers that all scenes fold back on themselves side to side and top to bottom.  I  hope to have a few pots to show in a future post around the middle of April.  Stay tuned.

Portraits in Clay # II

Additional Portraits:

Here are two additional portraits, an older portrait I did several years ago (Hooded Bob) and the finalized "Myxolodian Primacy".  "Bob" is an older porcelain, this an attempt to capture a historical figure, now lost to memory.


Is this the guy so framilar from "In a Distant Mirror"?  No telling, but here is another angle.


Enough for historical figures and now for something current, or as current as "a reinterpretation of American Gothic" can be.  This two head piece is titled, "Myxolidian Primacy" for obvious reasons.  I'm going to show several angles of this sculpture because it took me so long to create and set this scene up.  


I don't think Jo Miles wants to take credit for the black background photos, but without his camera and photographic eye, I'd be stuck with inferior shots.  Here is one of the individual heads for a close up. 


and two more photographed by Miles


And finally: 


I'd like to get this setting into a gallery, perhaps later in the year.